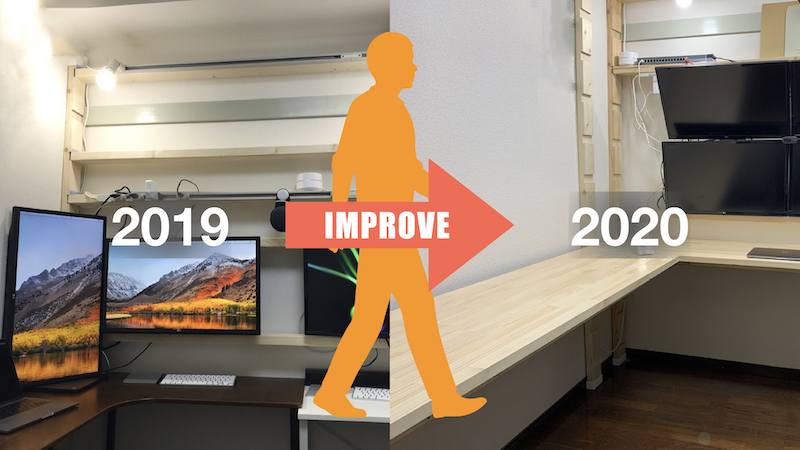
In the DIY workroom I introduced in “賃貸でもう少しがんばって生産性爆上げな書斎を DIY する(L 字デスク製作)” and the earlier “賃貸でサクッと生産性爆上げな書斎を DIY する(ラブリコ 2x4, 壁掛けディスプレイ),” I tried to make it as ergonomic as possible.
Creating a work environment based on ergonomic principles helps reduce physical strain. Of course, the effect depends on individual personality and physical condition, but I also hope to lessen eye strain, stiff shoulders, and back pain.
In this article, I’ll share the ideas and methods I used to create an ergonomically designed workroom that reduces physical strain.
Design Concept
I’m not an ergonomics expert, so I didn’t try to apply these ideas broadly. Instead, I focused mainly on indoor PC use, keeping the following points in mind:
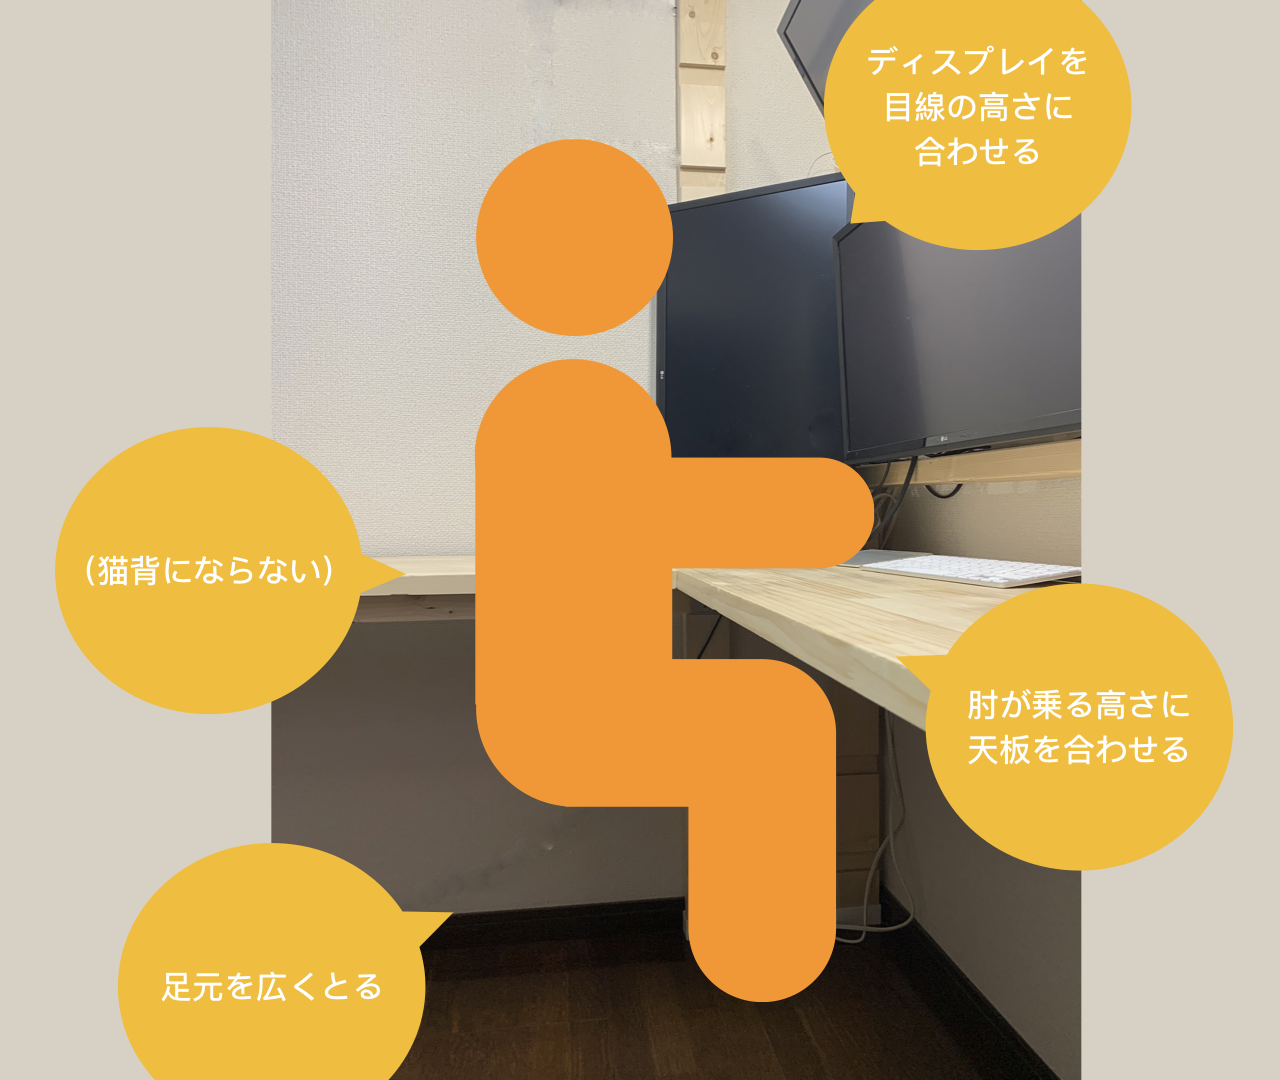
- Adjust the PC display to eye level
- Avoid hunching your back
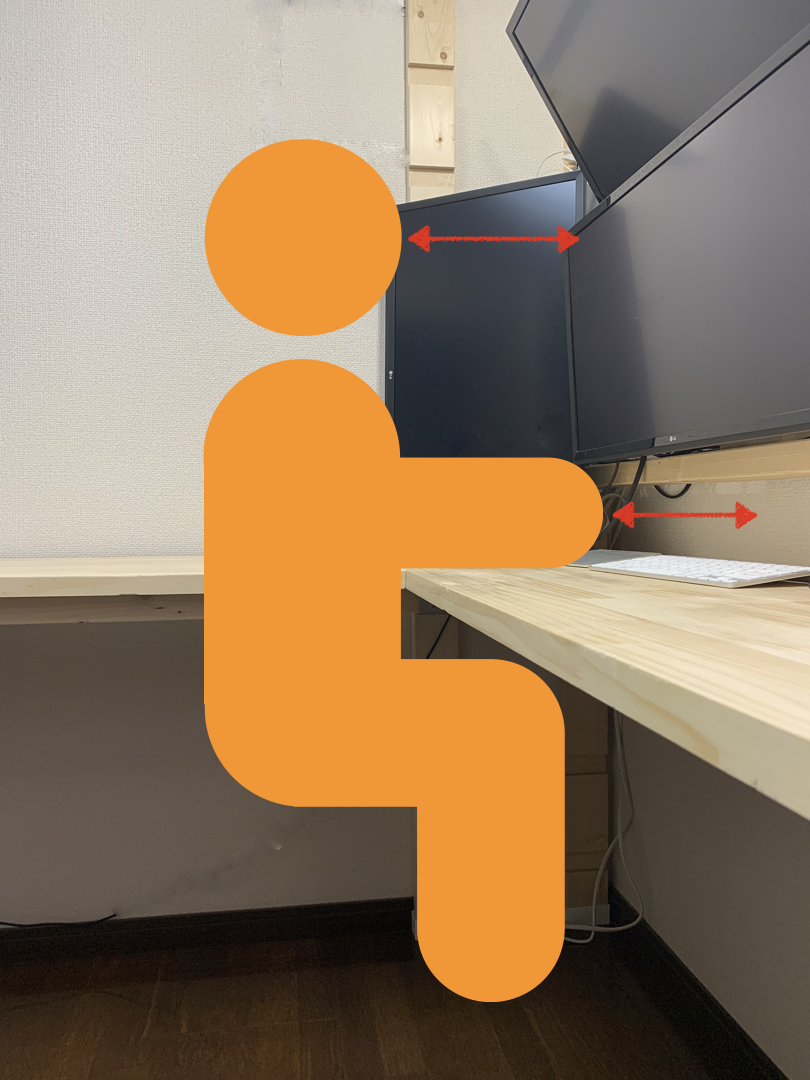
- Adjust the desktop to a height where your elbows can rest comfortably
- Leave ample space for your feet, and avoid obstacles that could affect your posture
As you can see, I didn’t consider anything particularly difficult, and listed as bullet points, they all seem quite reasonable.
I learned this basic idea from a former colleague who researched ergonomics, and I highly recommend his article “リモートワーク(在宅)における仕事環境の改善〜初級・中級・上級ごとに〜| kargo かるご / ErgoHealth | note” which clearly explains practical ways to improve your work-from-home environment.
In fact, you can adjust the height in point (1) with an office chair and footrest. For point (2), maintaining an upright spine is key, and a good chair is especially helpful. As for point (3), even if your elbows don’t rest on the tabletop, a good office lets you adjust the angle and height of the armrests to support your elbows correctly.
For example, a high-quality office chair such as the classic Herman Miller Aeron Chair can make a big difference.
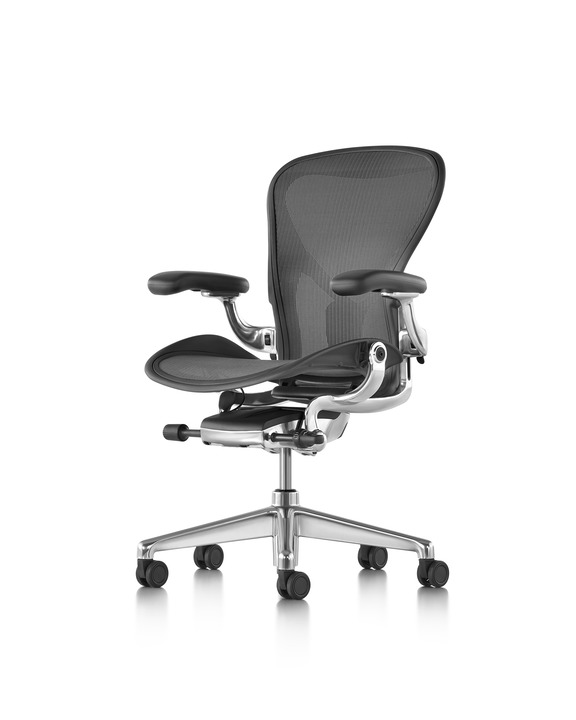
Image from Herman Miller’s official website.
However, since it is a work chair and set to be quite firm, it is not suitable for relaxing, such as sitting back to watch a movie. It should be used as a work chair. Of course, depending on preferences and body type, another chair may be a better fit. Since you can lean forward and backward, I found this chair suitable for both focusing and relaxing, whether working on a PC or on paper.
The reason for point (4) “leaving ample foot space,” is that if space is limited or obstructed, your feet will be forced into an unnatural position, causing your waist and back to curve and your posture to suffer. In fact, with my 2019 setup, the desk legs and my feet often got in the way of each other, and since the desk legs obviously wouldn’t move, I had no choice but shift my feet, which often left me in an awkward posture.
This too is related to the chair’s shape and size. Therefore, from an ergonomics perspective, your environment–including PC displays, desk, chair–should be considered as a whole rather than deparately, through it may be hand to address everything at once.
Design Principles
After considering how to create a room that reflected those concepts in a small rental apartment in Tokyo’s 23 wards, I decided to do it myself. My DIY design principles were as follows:
Spend as Little Time and Money as Possible
If DIY were the goal itself, I might invest time and money in it as a hobby, but since my aim is to boost productivity by improving my room’s environment, I do things as cheaply and easily as possible. Of course, I will buy items it is more efficient to purchase them.
For time and money, I aim to spend only what I wouldn’t regret discarding when I move, especially on items hard to relocate, such as desks and shelves. If I ended up unable to move because I didn’t want to waste the sunk costs invested in DIY, it would defeat the purpose.
Easy to Process and Easy to Dispose
When making desks or shelves, I build them to the exact dimensions of the room so that they are easy to use and resistant to earthquakes, even with amateur techniques. Since the shape, structure, and color all depend on the room, I make them with the intention of discarding them when I leave. As a result, I mainly use wood and avoid using large metal parts that are difficult to dispose of.
In addition to the techniques described below, the size of the wood is also important. If I buy parts that are too large for the hardware section at the hardware store, I will have trouble with both transportation and installation. Even with a car, anything over two meters is difficult to transport. If you order wide planks online, they can be delivered to your doorstep, but the longer and larger they are, the heavier they become, and the total cost including shipping will be much higher.
For this reason, I mainly use 2x4 lumber and accept visible support columns between the ceiling and floor. Of course, it would look better if the 2x4 lumber were hidden, but I’ve decided it’s enough to cover only the parts that bother me later. I’ve also generally given up on painting. As I wrote in a previous artile, you need space to lay out the materials, and if you paint indoors you must protect the surroundings, while painting outdoors raises concerned about paint and odors spreading to neighbours. Depending on the type of paint, you also need to consider disposal.
Underestimating Your Own Crafting Skills
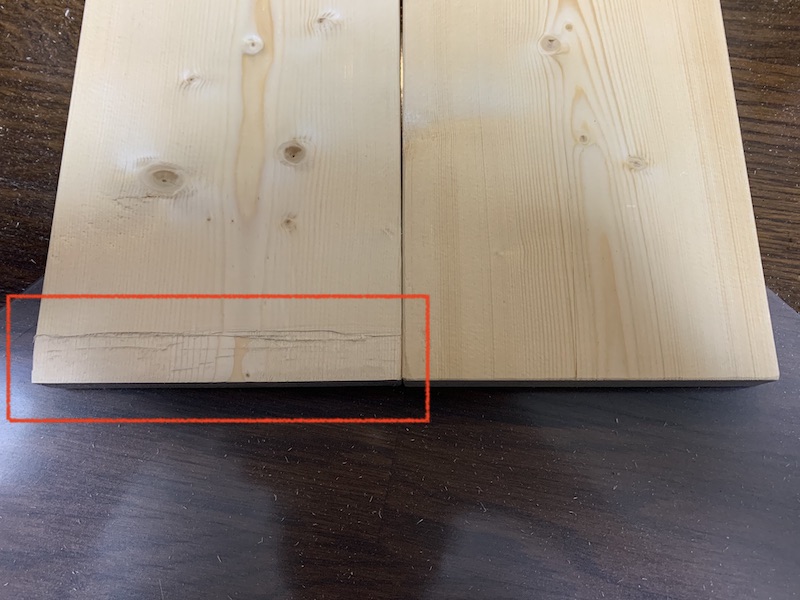
As mentioned above, I design, whenever possible, to sizes that can be cut at a hardware store and carried home. By having the hardware store cut as much as possible with their panel saw (see image search results), I can get both the lengths and the clean right angles as designed.
Since cutting fees at hardware stores are only a few tens of yen per cut, I would rather ask the store to cut even 10 cm than saw it myself and end up with pieces cut at odd angles and a pile of sawdust. Also, because of the limitations of panel saws, it is difficult to request diagonal or curved cuts, so I design everything to be rectangular whenever possible. I avoid using circles and triangles unless the parts can be purchased as they are. For example, if I made an L-shaped desk up to 2 m in length and width, it would be ideal to cut the top from a single piece of wood and finish it with a rounded inside edge, as shown in the diagram on the left.
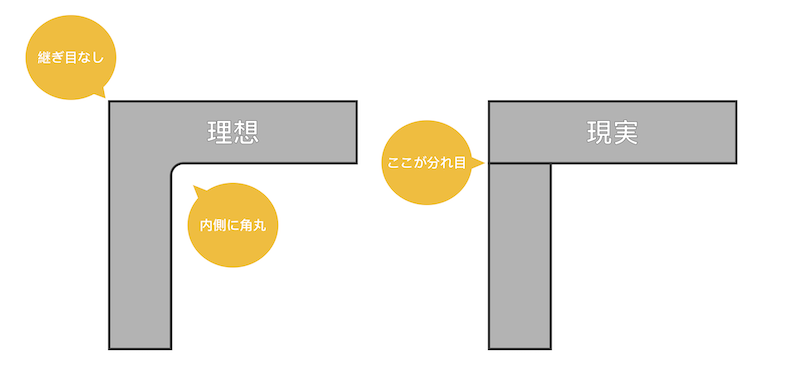
However, it is not easy to transport a board that is 2 m square, and it requires highly advanced machining: cutting in straight lines from two directions while keeping the correct angle, leaving space for the depth of the tabletop, and then cutting in a curve in the center. To achieve such machining, you would need to use various large tools, and it would take a considerable amount of time and money. A tabletop that could realistically be built would be made by placing two long, narrow boards at right angles to each other.
In this way, you turn your ideal into a realistic design that you can craft yourself.
Don’t Add More Tools
Tools, especially power tools, are very convenient, but they are noisy when in use and cause problems with storage and maintenance afterward. I’ve always admired power tools and would love to own a circular saw, trimmer, or grinder, but with these issues in mind, I designed my setup so that processing and installation can be done with a minimal number of small tools such as an electric screwdriver and router. As a side note, I recommend electric screwdrivers with LED lights. Even in places where it is hard to see under a desk or shelf, a light pull of the trigger brightly illuminates the screws, making work much easier.
In addition to polishing and carving, a router is useful for thinning the edge of a board by 1 to 2 mm when the edge is too thick to fit.
To create an inexpensive, quick, yet comfortable environment, I first imagine my ideal and then create a feasible design that takes into account all the processing required. In my case, simply combining rectangular prisms in Blender, a 3DCG program, was helpful.
By rotating it 360 degrees, you can easily see whether the object you pictured in your mind will give the same impression when it appears in real space.
Since you can simulate by freely rearranging structures without processing real materials, you can roughly estimate the strength of a structurem, consider the bending moment and other factors, and to see whether it will be strong enough for practical use.
Processing Examples
After finalizing the rough design, I purchase and process the materials. Since a precise design depends on detailed component specifications, I record only the structure and main dimensions, leaving the finer details to be worked out at the hardware store with a scale in hand.
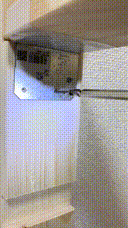
Wall-Mounted PC Displays
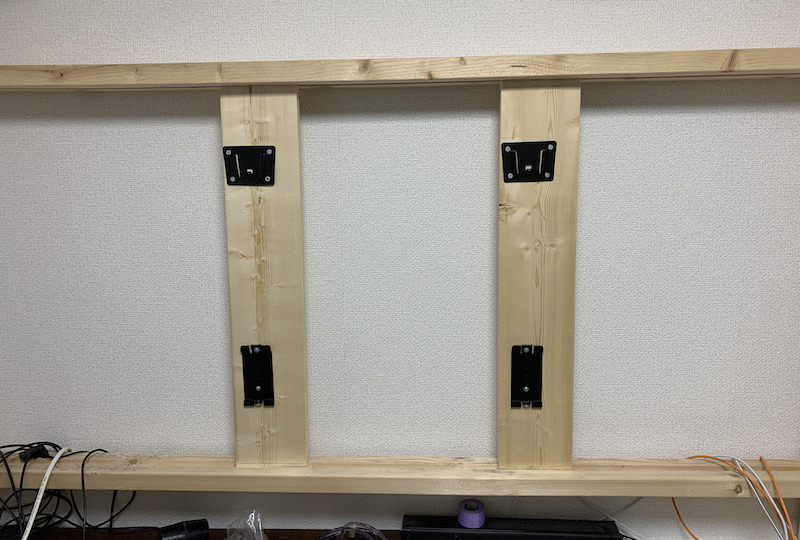
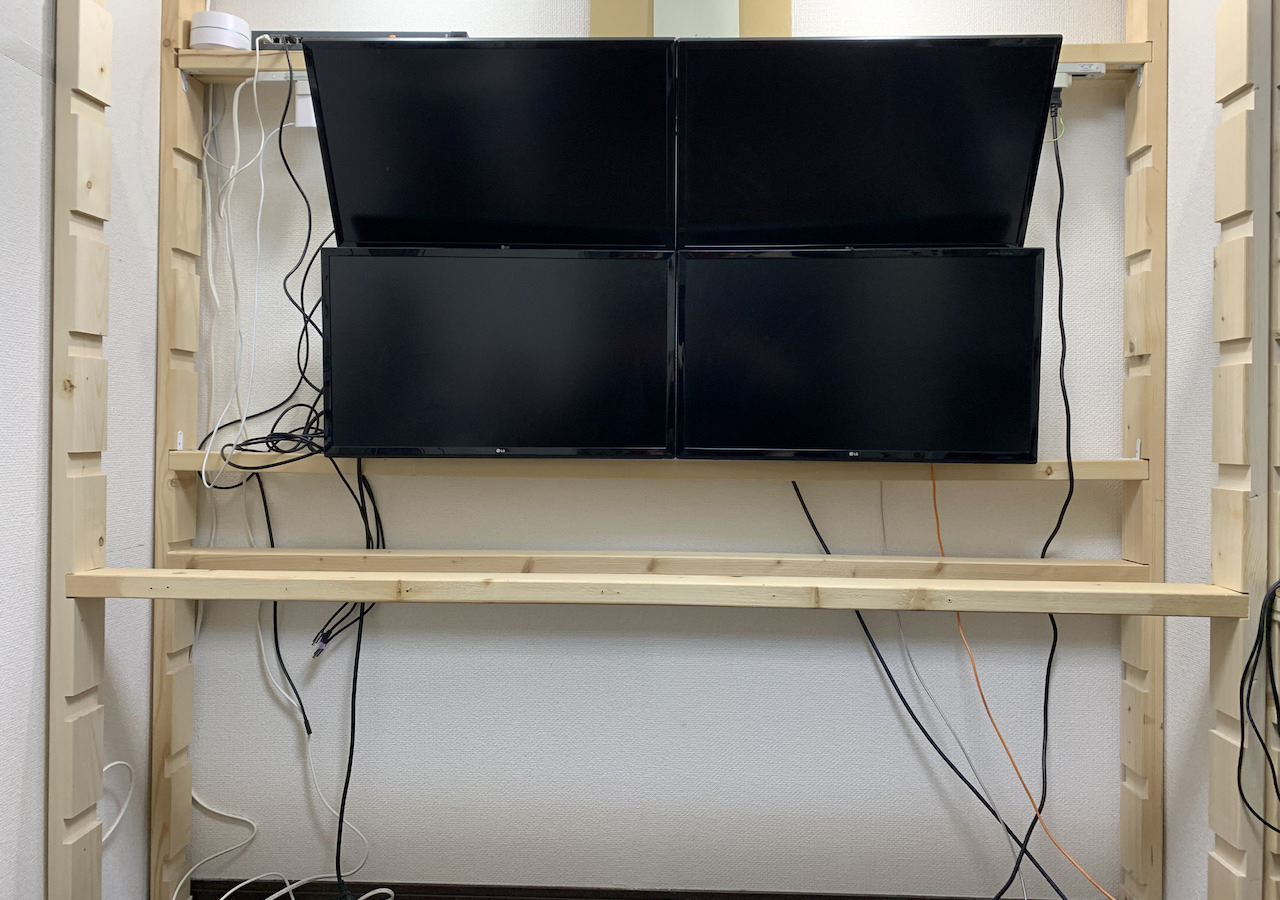
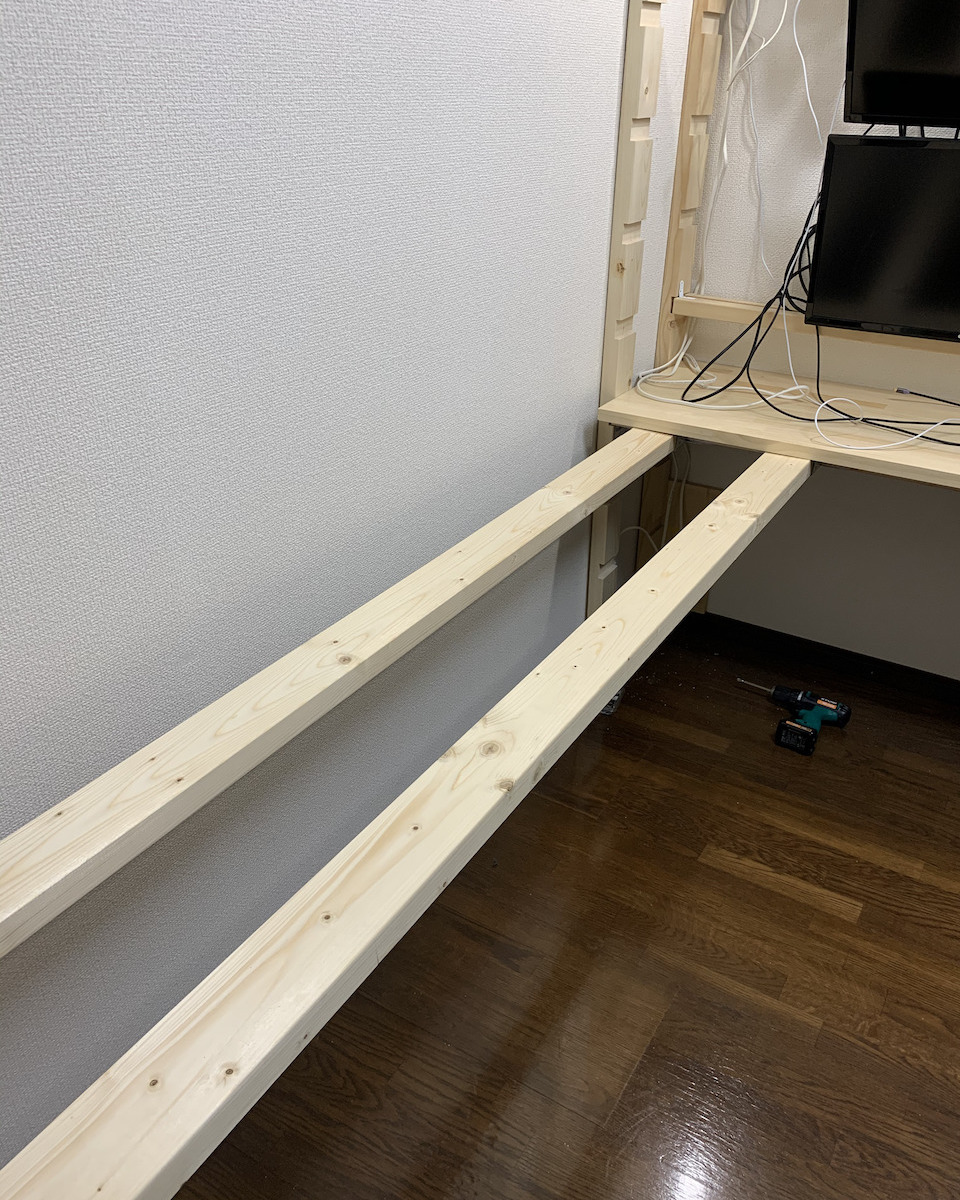
As noted in “賃貸でサクッと生産性爆上げな書斎を DIY する(ラブリコ 2x4, 壁掛けディスプレイ),” I built a frame with LABRICO 2x4 adjusters and grooved 2x4 lumber, using the horizontal grooves as rails.
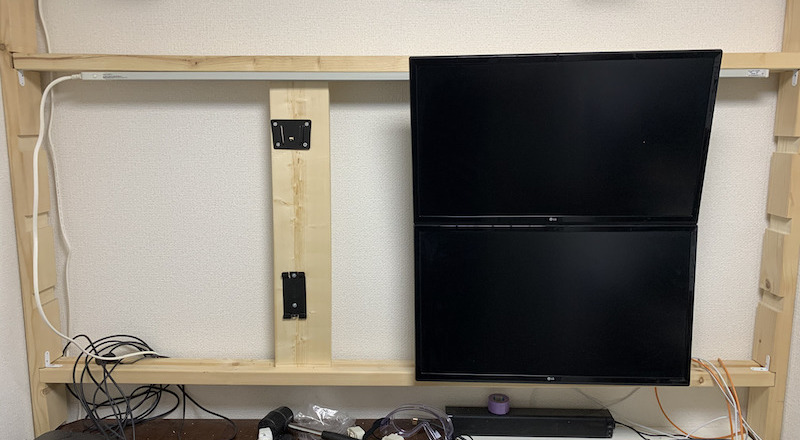
I fixed 1x6 boards fitted with display wall-mount brackets onto the rails. All brackets are intentionally offset to the left of center to suit my displays and avoid interference with HDMI cables.
Sitting for long periods, such as when working from home, often leads to poor posture such as excessive neck bending and a hunched back. Mounting the PC displays at eye level helps me maintain proper posture for longer. The space below the displays lets me position the screen at a comfortable viewing distance while keeping more room for my hands. With more space for my hands, I can rest my elbows on the tabletop more easily, reducing strain on my body.
Having displays suspended in mid-air gives a cleaner look and makes cleaning easier. These benefits can, of course, also be achieved with a display arm. However, there are few arms that can support multiple large displays, and if each display has its own arm, the arms may interfere with one another and require a large installation space. It is also difficult to find a display arm that securely holds displays in mid-air, and naturally, high-quality arms tend to be expensive.
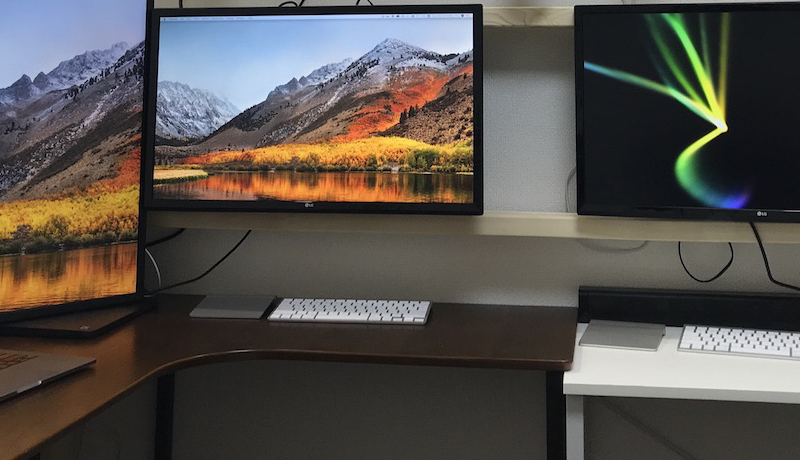
I used display arms in the past, but as my displays have become larger and more numerous, so I decided to adapt 2x4 lumber and mount them on the wall. Compared with a display arm, this structure has the advantage of supporting more displays and fitting any desktop shape or material. The distance from the wall to the displays may also be shorter than with a display arm. On the other hand, once this structure is set up, adjusting the height is cumbersome, so if frequent adjustment is needed, a display arm may be more convenient than a wall-mounted setup.
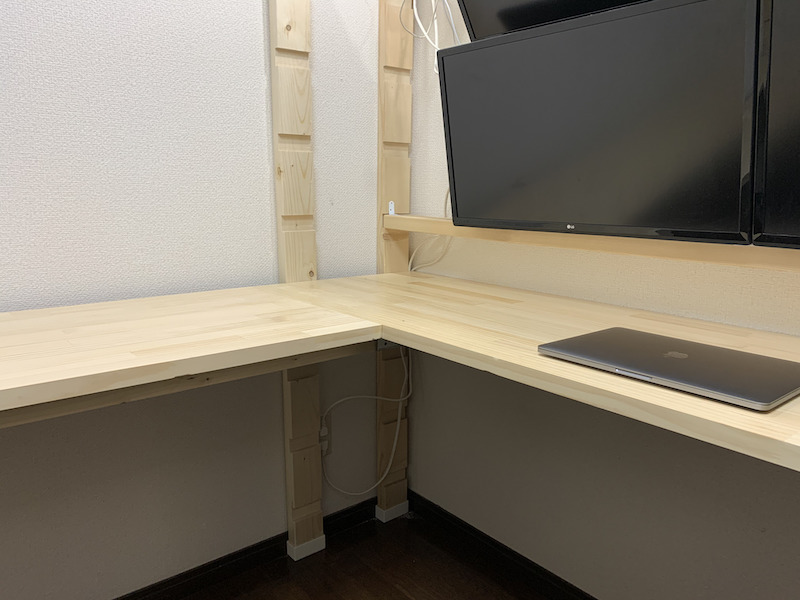
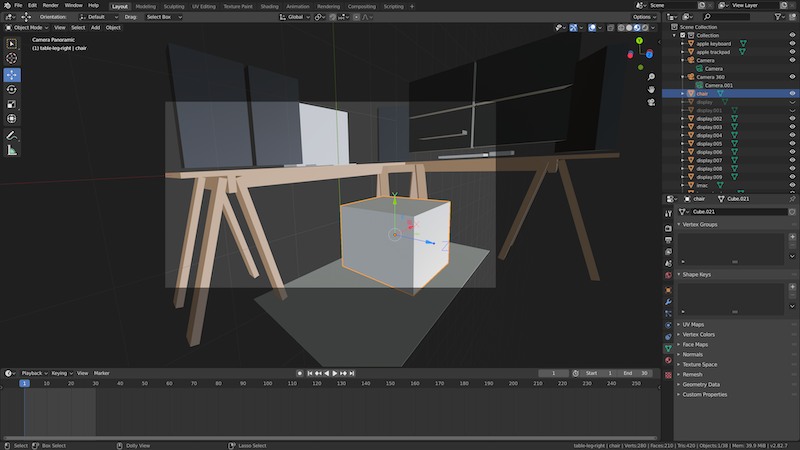
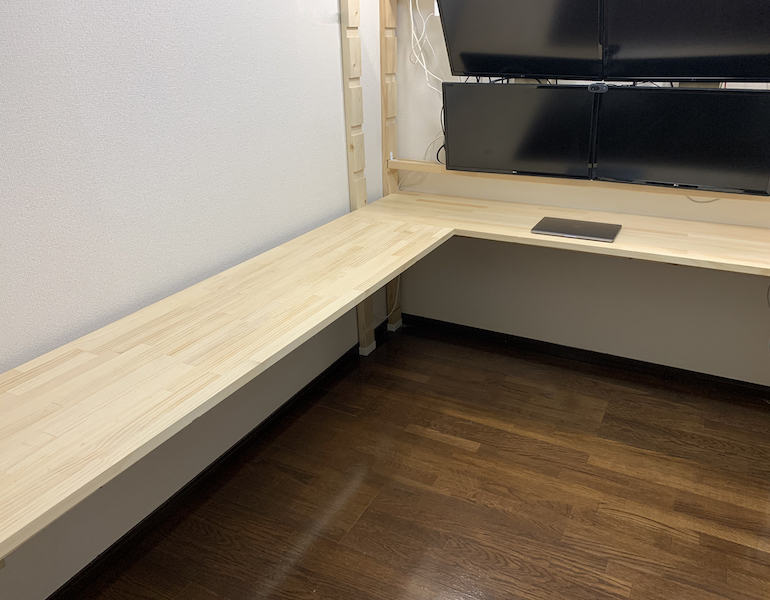
L-Shaped Desk
When I decided to “賃貸でもう少しがんばって生産性爆上げな書斎を DIY する(L 字デスク製作),” I abandoned pre-made desks and built an L-shaped one. Once again, building this desk made both my workspace and legroom more comfortable. The natural wood finish unified the texture, giving it a cleaner look.
The desks I used before were of reasonable quality and satisfying on their own, but I now realize that the uneven tabletops and the excess legs that came from combining several pre-made units were actually inconvenient.
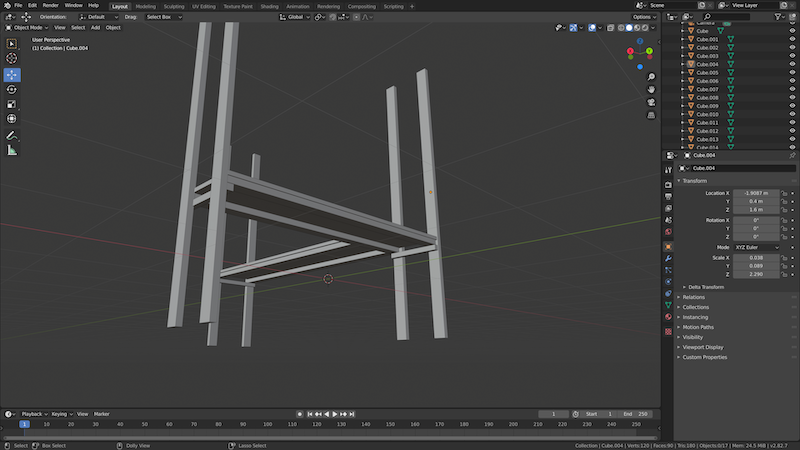
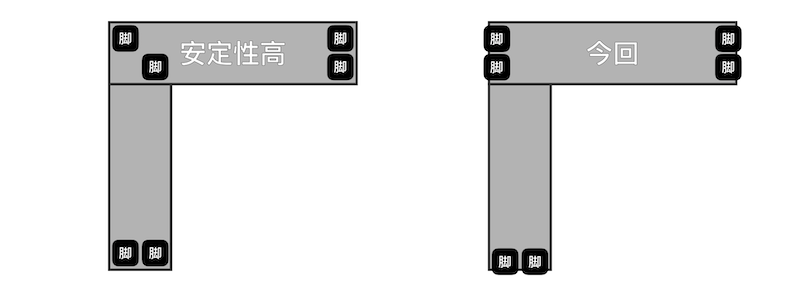
To keep the space beneath the desk clear, the structure is somewhat contrived. If stability and strength were the top priorities, the legs should have been placed as in the left diagram. However, I felt it was pointless if the legs were in the middle of the L-shape, so after careful thought I positioned them as in the right diagram.
To make up for reduce strength and to handle the twisting caused by the length and structure of the tabletop, all six legs were made from grooved 2x4 lumber and braced at the top and bottom with LABRICO. The braced legs were then connected with 2x4 lumber, on which the tabletop was placed.
I used metal fittings to secure the 2x4 pieces. Fittings of this size can be disposed of as non-combustible waste.
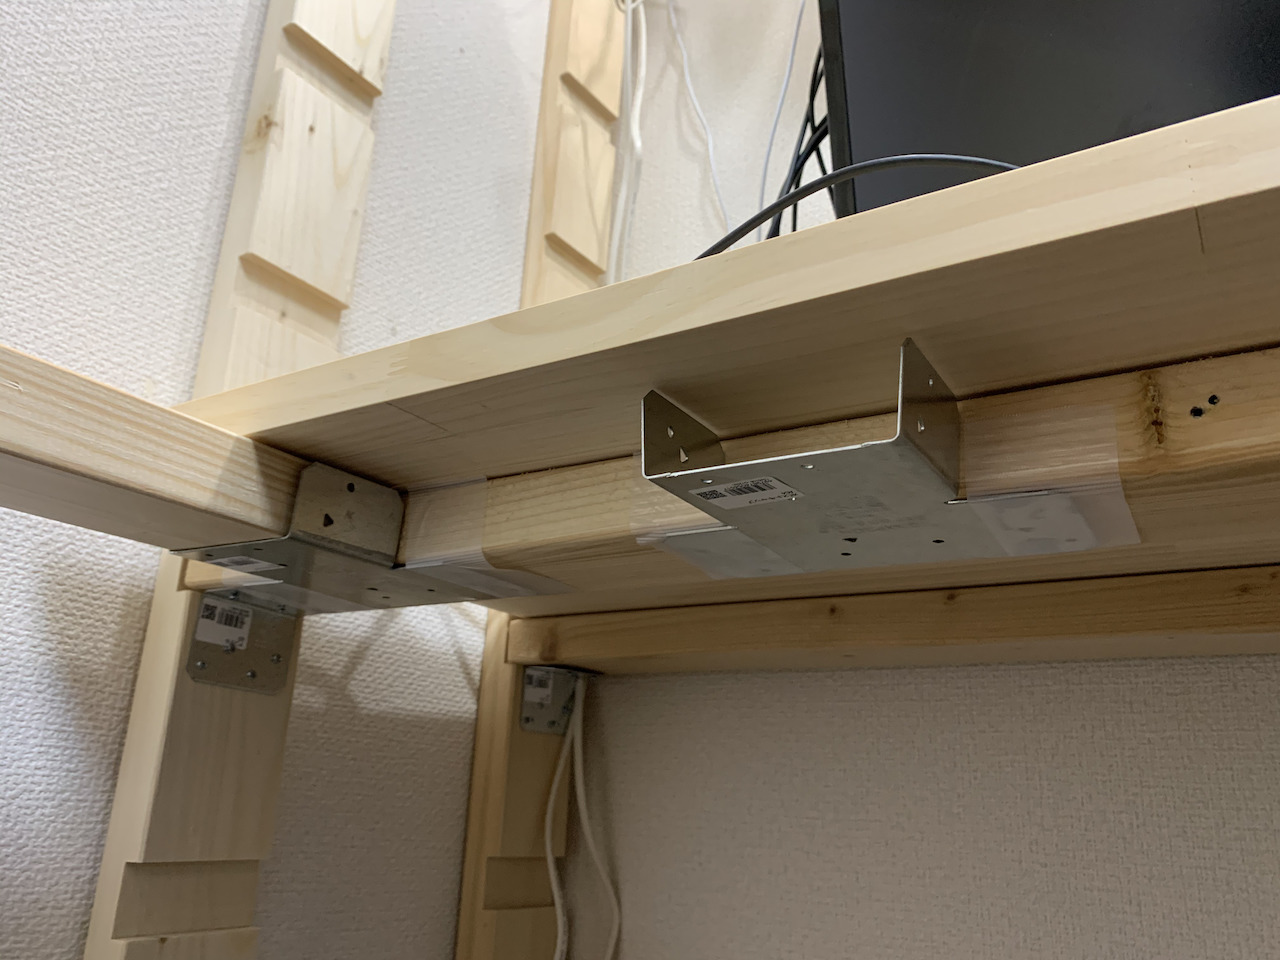
This is the structure viewed from above inside of the desk, showing only the 2x4 lumber.
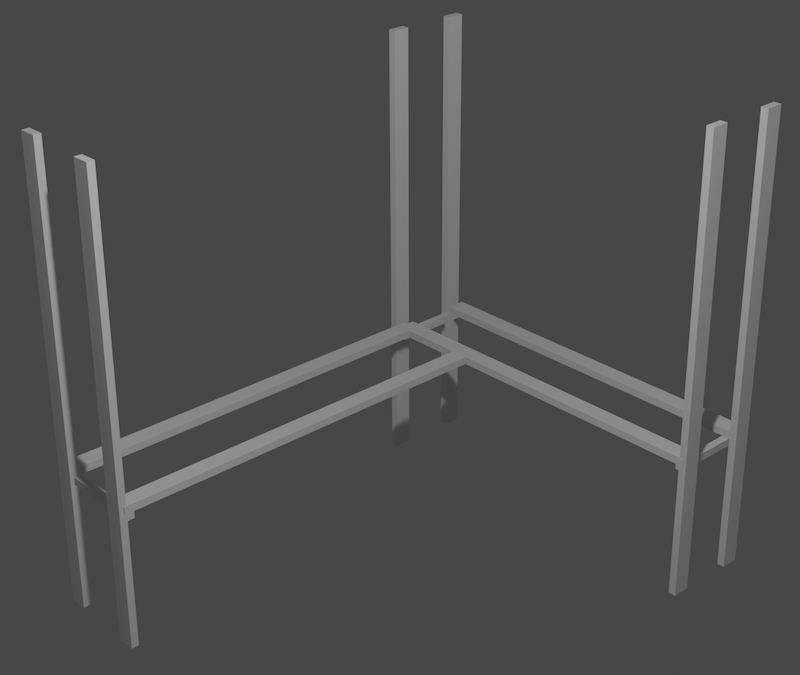
This structure gives complete freedom of movement for the feet.
Placing a good chair in the newly freed space for your feet will greatly reduce the strain on your body. I tried the Aeron Chair for a while, and it was truly excellent. Since a chair isn’t something you can make yourself, so I want to choose one that suits me and will last a long time.